Monday, November 16, 2009

On my wall

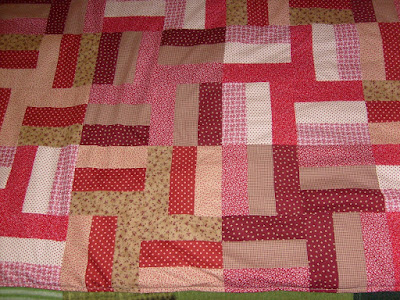
My favorite quilt, which D finally hung up in my studio last night.


I made it well over a year ago and it's far from perfect, but I love it! The picture does not do it justice -- come visit me and see it in person! You'll have to wade through piles of vintage bedsheet scraps, but it's totally worth it. Trust me.

Sunday, November 15, 2009

Vintage, yellow and roses

What could be nicer to wear to bed? This fabulous pattern from Ducky House uses the hem on a vintage bedsheet to finish a tailor-made pair of pajama pants, and it couldn't be easier.


The pajama pants experimentation continues. I was disappointed, when I tried these on, to find that the too-high-slightly-snug-waist problem had shown up again, but this time I took action. I cut off the waist casing that I had just sewn and sewed one on the now-shorter pants, tried them on and was reasonably satisfied with the results. I'm going to make the waist on the next pair even lower, and I think that will solve the problem altogether.

And yes, for those of you who are wondering, I did iron them before I photographed them, but I doubt if I'll need to do it again as they're made with No-Iron Percale. Definitely a plus.

Saturday, November 14, 2009

Cozy

I never would have thought of this myself, but it seems that laptops need cozies. Do a Google search on "laptop cozy" and you find quite a number of choices, whether you want to make your own or buy one ready-made (though of course you want to make your own.) The other day I stumbled upon a magnificent cozy on One Pearl Button, made from a beautiful cabled sweater-vest, and I knew that soon I would be making my own.

My cozy is made from a felted pink sweater, which I loved because of its flowery embroidery on the shoulder. Of course the embroidery was in a completely inconvenient place, so I had to applique it onto the front of the cozy. I was a little nervous but it came out nicely. The sweater was a little on the short side so I added a gusset at the bottom made from one of the sleeves. I lined the whole thing with a cream-colored cashmere (nothing but the best for my laptop) and made an elastic casing at the top.


Now when I'm not using it my laptop is snug as a bug in a rug!

Friday, November 13, 2009

Stacked Coins Doll Quilt

Yesterday's post featured an improvised rail fence quilt taken from mainly reds in my stash. Since I decided to make the blocks first, then determine the layout, there were a number of leftover blocks. Here's what I did with them, influenced by the Stacked Coins Doll Quilt in Remembering Adelia: Quilts that Inspired Her Diary by Kathleen Tracy.

It used up all the leftover blocks and only took a little scrap fabric from my stash to finish. I'm so pleased with both red quilts that I'll be re-creating them in blue and posting instructions for making them here, hopefully in the near future.

I'm thinking of making a doll bed, complete with mattress, sheets and pillows, out of a cardboard box (because those make the best toys, as everyone knows), to give to K at Christmas.

Thursday, November 12, 2009

Red Crosses Prayer Quilt

Maybe they're a little more like pinwheels, but I like the idea of thinking of them as red crosses given to someone in need -- of prayer, comfort, warmth, what have you. This quilt came out of a desire to have something to bring to our church's prayer quilting session today, and a strong urge to make something with the pretty red prints in my stash. I took nine prints and made rail fence blocks, intending to arrange them however they would go once they were all complete, and this is the pattern they took.


Like any other blanket, the red quilt attracts cats. Here it is in its full lap-quilt stature. I'll be taking it later today for folks to put the ties in.


A detailed explanation of what a prayer quilt is and information about the Prayers and Squares organization can be found here. The specifics of our church's chapter is on the Outreach and Inreach section of St. Mary's website.

Monday, November 9, 2009

The (doubly) green artsy blanket

As promised, my weekend project:

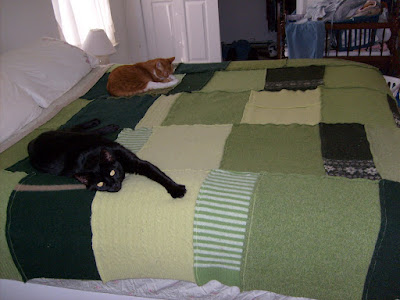
"It's a cat bed for two cats!" exclaimed K.

It's really a free-form sort-of patchwork felted sweater-blanket -- or, as one seller on Etsy described their version of it, an Artisan Crafted Repurposed Felted Wool Blanket.


It's made from the trunks and sleeves of maybe 12 or 15 felted wool sweaters, zig-zagged together with lapped seams (that just seemed the sturdiest way to do it) and edged on the sides with ribbing cut from another sweater. I considered making it reversible by doubling the sweater pieces, but a) I wasn't sure how to do that, b) I think the backs of the sweaters are softer to the touch and would be nicer to have against your skin anyway, and c) I kind of thought that two layers of sweater would make the blanket too heavy. At about 76" x 87", it covers our queen-sized bed. (I didn't mean for it to get so big, but you know how things go...)

I washed it in cold on my machine's "hand-wash" cycle, and dried it on high (I dry everything on high; it's just a bad habit I have) and it came out soft and fluffy, if a little fuzzy. I plan to go over it with a sweater stone but I need to buy a new one when I go to the fabric store, so for now I'll live with the fuzz.

I love that this blanket is made from repurposed materials (hence the name), and I love that it feels like wearing an extra sweater in bed without the uncomfortable bulk of actually doing so. It will compliment my pillowcase quilt nicely (that's for another post) and making it is a step toward developing more of my own designs. I also love that it is green.

At the moment

Behold, my studio. I have just finished a major creative project, one for which I should have logged hours and expenses as I may decide to sell it. (If I can convince myself to part with the item, similar ones are selling for big bucks on Etsy.) I would show you what I made, but it's currently tumbling through the dryer. (I hope it's okay...) So watch this space; I have so much to tell you about but in time, in time.

Posted by Picasa