Showing posts with label mistakes. Show all posts

Thursday, February 10, 2011

Frogging

Well, I had a premonition but I didn't want to say anything.  The neck looked a little too small, the sleeves a little funny, the chest not quite chesty enough.  And (oh, shame) I had not swatched.  I got about three inches into the body and had started inserting some desperate little increases when I noticed three little links on the Ravelry Shalom Cardigan page:


Oops.

Monday, February 15, 2010

Guinea pig mattress -- Adobe glitch

For those of you in Guinea Pig world who may be trying to get at my Guinea Pig Mattress Tutorial and having trouble, I'm told that there seems to be a bug in the latest version of the Adobe software. Turns out that you can load the PDF just fine when you click on it, but you can't *see* the PDF in some browsers until you *resize* the browser screen. It's not a disaster, and I'm sure Adobe will get it cleared up soon -- but it's been confusing to more than one person, and I want the instructions to be available to anyone who'd like to use them, so I thought I'd mention the fix for it here. Happy sewing!

Friday, December 4, 2009

Violet Beauregarde, complete

I fixed the hole! Now my sweater is wearable! First I re-knit and grafted the stitches together according to the methods given in this article. Then (though I know some of you will shudder at this) I darned over the graft because I was so worried that I hadn't done a good enough job. It doesn't look bad, especially when I wear the darned part on my back, and when I consider that this is my very first sweater EVER I feel quite successful about the whole thing. I learned many lessons and still came out with something I could wear. In public. Which I'm doing for the first time today, Violet Beauregarde and Barney be darned.

Posted by Picasa

Saturday, October 24, 2009

Ribbing

In working on the knitted prayer shawl I mentioned in a previous post, I have learned that knitting ribbing is really easy (which is kind of what I'd thought) and that it's also really hard (if you don't understand the directions or pay attention to what you're doing.)

Directions: Cast on 80 sts. Sl. 1st st., k1p1 to end.

How difficult is that? Assuming you've really cast on 80 stitches (which you'll need for the cables later, and which I never even got to), you then need to know which way to slip the first stitch, knitwise or purlwise, and what those things mean anyway. (I sort of understand what they mean, so I slipped what I'm pretty sure was knitwise.) Then you need to know that you skip the first knit stitch and go right to the purl. I had to read on in the directions to work this out. It took me about ten tries. Finally, you need to remember to keep alternating between knit and purl stitches, which in theory is easy but is hard when you're just learning. Don't try to do it and chew gum at the same time.

Now, in Stitch and Bitch they basically say that to do ribbing, you knit the knits and purl the purls. When I tried approaching it this way (in a k2p2 pattern) I had no trouble at all getting it right. Looks like I've been knitting ribbing all my life. Huh.

I only cast on 32 stitches this time so we're looking at more of a scarf than a shawl, but I think I'm ready to move on to cables. Watch this space.

Wednesday, October 21, 2009

Notes to self

If you're going to be drinking tea while knitting, do not store stashed yarn on the floor in between tea-table and knitting chair, unless you want to spend the wee hours of the morning rinsing out expensive wool and alpaca yarns and hanging them to dry when disaster ensues, and spending who knows how many days wondering if they will dry in usable condition. Not to mention running soggy bath towels through the wash, scrubbing your good white woolen carpet and kicking your sorry behind.

Also, no matter what the picture in the knitting book looks like, cheap acrylic yarn is still that. Go with the good stuff and spend more time knitting and less time frogging.

Friday, August 21, 2009

Beach Blanket Botch

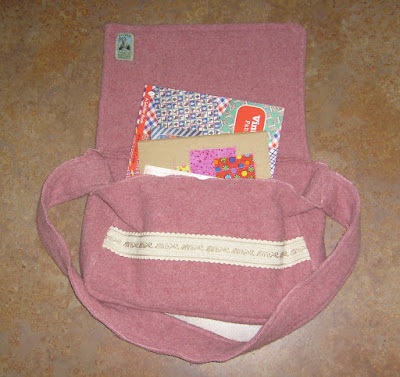
Well. It seems I have made another cat bed. This one competes in popularity with the ridiculous pink wool messenger bed I made earlier in the summer.


What you see here is the back of my Beach-Blanket-To-Go, my first attempt at a project from Amanda Blake Soule's Handmade Home, a book whose release I've been eagerly awaiting for nearly a year now. It's full of intriguing possibilities, and the beach blanket looked like a no-brainer to this moderately experienced crafter/sewer. Frankly, I'm perplexed as to what went wrong, but the layers went lumpy and the binding got twisted somehow and the whole thing just looks wrong.

I have some ideas for things to try differently in attempt #2, including making my own binding instead of using purchased bias binding, and trimming the edges after machine basting the layers together so the binding goes on evenly. We'll see how it goes. I'm not completely discouraged, but I am sad that I won't have a blanket made with my pretty gold chenille bedspread that I found while antiquing with D last weekend.

Well. Chalk it up to experience and give it another go.

Sunday, August 9, 2009

Felted wool baby blanket

Where does the time go? I've been sewing up a storm and have many projects to show you, some of which are in the washing machine right now so can't be photographed, but here's the latest sort-of triumph: A felted wool baby blanket with a soft fluffy flannel backing, another project from Betz White's Warm Fuzzies. Here's a picture of the work in progress, where I'm trying to decide which color thread to use for embellishment. (In case you were wondering, I went with the blue. It's a little hard to see in the picture of the finished product, which I will feature on the next entry.

I really like the color combination, but I was unhappy with the finishing touches, not shown here. The edge-stitching looks relatively even on the front, but messy on the back, which happens to me a lot in projects like this, and I just can't seem to figure out how to fix this problem. I think possibly I rush too much at the end because I'm so excited to see the project finished, and that taking my time would result in a neater completion.

Anyway, the cat likes it, and it's soft enough and fluffy enough that perhaps some baby will too.

Tuesday, June 30, 2009

Mishmash: Summer vacation edition

So I've been busy thrifting. The cashmere sweater supply in the area is nearly depleted, so I'm going after the vintage linens now. Look at these lovely sheets:

They made up into a fabulous duvet cover, tutorial found here:

And it's reversible! I couldn't get a good picture of the other side with my cheapie camera, but you can sort of see it under the photo of the wool messenger bag from Akiko Mano's Linen, Wool, Cotton that I made.
I'm not at all sure how I feel about this one. I made it out of an old (felted) wool blanket, and it was very hard to do. The wool was thick and awkward, and it fought with the needle and wouldn't fit under the presser foot very well when there were more than two layers, which there often were. The lining fabric that I chose was just -- well, wrong. It was a quilting weight cotton and was just entirely too light for the bag. I made up at least three different linings (good thing I bought extra material) and got frustrated and took it out on the bag and had to do some creative zig-zagging. I ended up using no lining altogether.

It was an interesting project, but the end result is just weird. I'm going to try it again with a lighter weight, more normal colored wool and see what happens.

Other projects I've been working on: another pair of pajama pants and a top, which I'm not going to show you because they're completely insane. I made them out of a pair of polyester/cotton sheets (note to self: do not do that again) and they are sweltering and ugly, with giant blue roses all over. I don't know what I was thinking. I also made a top from a lovely vintage pillowcase, which I'm not going to post a photo of because you can see the exact same thing on Betz White's blog. I felted some soft creamy wool to make patchwork-bound baby blankets with. And I've started to work on a grown-up version of the cashmere blanket -- look for it soon.

Friday, May 15, 2009

Ride 'em Cowgirl!

I'm filing this one under Live and Learn.

K's Spring Concert was last night and she needed an Outfit.

The Rules were: The top had to be white. The bottom had to be Dark Blue or Black (and could have red accents) but Not Jeans. (K also wanted something she could wear for the Fourth of July.) The Kindergarten and Pre-K were to wear Cowboy Hats if they could obtain such.

I looked first at K's wardrobe and found a pair of dark blue stretch pants and an old white t-shirt. No good. I looked at Target and found a soft white smocked blouse. Good. A short black skort. No good. Tight black lacy leggings. No good. K does have a cowboy hat with red trim. Good.

I checked my fabric stash. Many Fourth-of-July novelty prints but nothing suitable. Feeling fairly certain that the local fabric stores would turn up with nothing, I took a ride out to Jo Ann Fabrics. Looked at linen, denim, silk charmeuse, flannel, homespun, gingham, calico, muslin, organic cotton -- back to the linen, which was soft and in a lovely blue, bought 3/4 of a yard of it along with some bandanna print ribbon, an actual bandanna and some black non-roll elastic, and headed home.

I washed, dried and ironed the linen. Started the Lazy Days skirt pattern and worked slowly and carefully. Noticed that the linen was not 45" wide as called for in the pattern, but 60" wide, but didn't worry about it too much -- figured that the skirt would just be fuller. Oh, how wrong I was! When I threaded the elastic through the waistband, I saw that the extra fabric caused there to be less gathering, not more. So I cut the elastic smaller and sewed it back together. And in my haste I cut it too small. So I cut the elastic apart. And in my haste to remove it, I pulled the elastic all the way into the waistband, rendering it extremely difficult to retrieve.

At this point I began to have serious doubts about whether a 5-year-old would even consider a linen skirt to be acceptable Fouth-of-July or Cowgirl attire. I rooted through my stash again and and found some blue starry quilting cotton, not really of clothing quality by my standards but it would do for a cowgirl costume. I began working on the Lazy Days skirt again, slowly and carefully. All the way to edge-stitching the bandanna ribbon to the hem of the skirt.

Satisfied, I began to iron the finished product. And the ribbon began to fray and pull away from the skirt! Oh no! Nasty cheap craft store ribbon! I couldn't cut the ribbon hem off of the skirt and try again with different trim, because the skirt was already as short as I was willing to make it. I looked through my notions bin (a total disaster area!) for some narrow red trim to sew over the edges of the cheap ribbon. I found some rick-rack and some grosgrain ribbon that would work. Not stopping to think, I pinned the rick-rack on, ran it through the machine, and did the same with the grosgrain. The end result was both sloppy and silly-looking. The trims didn't quite match in color, and why hadn't I thought to use the grosgrain twice, which would have given a more polished look? I was really disappointed. But time was running out. It would have to do.

Unless -- I took my loop turner and pushed it through the waistband of the linen skirt, hoping to catch the elastic with its hook. Instead I poked a hole through the fabric. Done! I ironed the starry skirt and hung it up on a hook to wait for K.

The verdict? "It's weird, Mama."

Could be worse!

Posted by Picasa

Monday, May 4, 2009

Catching up

It's been a crazy couple of weeks -- I'm thinking I need to modify my weekly plan to include some flex days where I can concentrate on housework and errands and bill-paying and not so much on creative work, important as that is.  There just don't seem to be enough hours in the day.  But despite all the time I've had to spend catching up on those things I've managed to give a fair amount of time to creating; it just hasn't always been what I've wanted it to be.

I put in a few hours making birthday gifts for K's friends.  First was an unsatisfying hoodie towel for a 6 year old boy.  There just wasn't any flannel in the fabric store that I liked, and it didn't come out looking right.  Then came an unimpressive art-to-go bag for a 5-year-old girl.  The straps came out uneven and I decided it was not a good enough gift, so I kept it for my own use and made her a very nice felt pencil roll and included some watercolor pencils and a brush -- I think she'll like them, I must remember to send them to school with K today as she missed the party last week.

Also, for the last week I've been working on my Secret Quilt Project, which can now be Not So Secret since I've decided that it won't be a gift for anybody because it is clearly a Practice Quilt so I will be keeping it for home use.  I am using the "Go-to Quilt" pattern from the Katie Did blog, with chartreuse and pool blue as my solid colors and a medium-scale floral with those colors and a darker teal for my print, and dark grey thread.  It's attractive to me but I'm not sure it would be to anyone else, and the stitching lines are kind of sketchy and look more like bolts of lightning than straight lines in places and rainbow arcs in other places.  I think that perhaps attempting a queen-sized version of this quilt for my first try was a mistake.

I have also been collecting materials for other projects.  Yesterday I went to Village Thrift in Pennsauken, a wonderful source of vintage materials that I can't remember if I've mentioned before, and collected a pretty 1970's pillowcase and a (slightly itchy) rose-pink wool blanket.  The pillowcase goes with a small collection I'm growing that I hope will become a patchwork duvet cover for my bed; the blanket will become, among other things, a throw for the tv room, a hot water bottle cover, and possibly a pair of slippers. 

In the works:  dawni's quilt, a miniature schoolhouse quilt for K's teacher, baby gifts, some small things with the linens from Philip's, a couple of drawstring bags to hold tights and slips and other unmentionables, hoodie towels for K to take to day camp and if K has her way, boots and umbrella for a 3-inch-tall kitty -- keep dreaming, kid!

Friday, March 20, 2009

Fit to be tied

I finally finished stitching the binding to the back of the quilt this afternoon. It's been a slow five days, but for once I feel secure that the edges of my quilt will hold together -- no fraying and raveling on this one -- and the corners surprised me by mitering nicely. Now it's time to pull the layers of the quilt sandwich together by tying a square knot with white pearl cotton in the center of each four-patch. I started doing that earlier this evening and I'm liking the way it's going. Helps to balance the bright, crisp blue flowered border with the hippy-dippy scrappy-patchy center. I'm liking it. Except.

The whole idea behind the four-patch quilt design was that it should have an amount of structure without being stuffy. The blocks were laid out just so, from top left: light patch, dark patch, light patch, dark patch, so that -- in my mind, as I set up the rows -- the dark patches were like stair-steps climbing up the quilt. Nothing sophisticated, to be sure, and it won't win any prizes for visual effects, but I do think it's easier on the eyes than a totally random layout would have been. And then I take a closer look.

Of course I knew there would be mistakes. There are ten zillion squares in this thing. Some of them were bound to get turned round the wrong way. No big deal. It's when I begin looking for those oversights that I begin to drive myself berserk. Because, of course, they're all I can see.

As I work through the four-patches, inserting the ties, I'll have a chance to notice, lament and remember every single mistake. Then I'll name the quilt, wash it and put it on my bed, and it will mellow and age. I'll read, write and watch TV under it, spread it on the grass and picnic on it, wrap and transport antique furniture in it, and fold it in a laundry basket for an old, old fat cat to sleep on. The colors and textures and harmonious and discordant patterns will become faded and fixed and ultimately, utterly beloved -- no need for any concern about flaws here.

How many "mistakes" can you find in the picture of the quilt top, if a mistake is a four-patch where the dark diagonal is turned in the wrong direction? I'll count how many are on the actual quilt, and if our numbers agree I'll do a drawing and make someone a surprise!

Monday, January 12, 2009

Pajama pants pattern experiment

Let's just say it didn't go so well.

Ok, I got the instructions out and read them carefully. I figured out which pattern pieces I needed. I cut the pattern pieces out from that pathetic skimpy brown tissue paper. I pinned them to the fabric in such a way that they all fit with a little room to spare, and I cut them out with the rotary cutter (note: bad idea, regardless of what my sewing book says.) I cut the notches (note: cut them out, not in, next time) and penned in the dots with disappearing ink. Then I re-read the instructions and started to sew.

I tell you what, though, those dad-gum instructions are darned hard to understand, especially for someone whose visual-spatial comprehension skills are somewhat limited, as mine tend to be. Give me more verbal directions, please, explain to me what I need to do and then label your diagrams and I'll be fine.

I'm not going to tell you which parts of the pajamas I actually sewed together, or attempt to describe the anatomy of the person who could potentially wear the pants I produced. I'm just going to give it a little time, take a few good deep breaths, and try, try again.

Wednesday, January 7, 2009

Debacle

I finished my quilt top. It's beautiful. I would love to show it to you. Except.

I opted for the "quick-turn" or "self-binding" method of finishing the edge, where you assemble the quilt sandwich inside-out, sew around the edge, and then pull the layers through a hole in the seam, sort of like making a pillow or a stuffed animal. Easy, right? Except. I put the layers in the wrong order, backing-batting-top, when they should have been top-backing-batting. And I sewed it that way. And clipped the corners. And only noticed my mistake when I went to pull the layers through.

So my quilt top is trapped in a broken sandwich, and I have to unsew a million billion stitches to free it from its batting and backing before I can show it to you. And then I have to piece together a new backing and re-layer and re-sew the sandwich, taking special care around the darned clipped corners. The good news is that the pieced quilt backing will surely be more interesting than the plain one I had originally been using. Plus, it's my learning experience. I find that every quilt I make has a lesson in it. Usually the lessons don't involve the kind of agony that this one did, but there's always something.

Side note: K has been using her Dover stencil books we gave her for Christmas and birthday to create lovely pictures. She does little tricks like stencilling in a giraffe, then repositioning the stencil slightly so she can stencil in another head to create the effect of two giraffes standing side by side. I think that's pretty clever for a five-year-old.